|
|
|
|
Once you have met the Pre-installation requirements, you can create your Unanet database. This page details instructions on creating the Unanet database using Microsoft SQL Server. If you are using Oracle follow those installation instructions instead.
Note: When using SQL Server you must specify the JTDS driver in the unatime.database.driver property in the db.properties file.
Important!! Please make sure you are installing Unanet in a supported database version -- see System Requirements for more information.
The topics covered on this page include:
You'll need to follow the Microsoft Installation instructions for installing this product on your servers. A few important considerations prior to installing the Unanet product include:
Make sure you have applied all of the latest SQL Server Service Packs
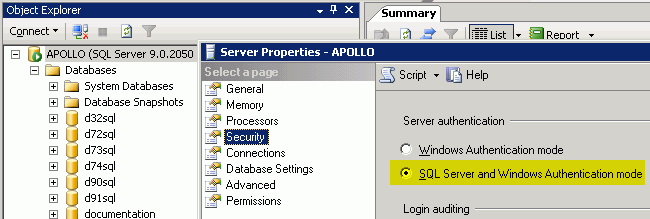
When given the choice during the installation process, make sure you allow both SQL Server and Windows Authentication modes. If not done during the initial installation this setting can be change by navigating to the SQL Server properties for your machine (see illustration below), this typically requires a restart of sql server after this type of change).
(note: ALWAYS use these connection settings when doing other operations on the Unanet database)
Set the Server Type to ”Database Engine”
Set the Server Name to the machine name of your Sql Server server
Set the Authentication to ”Windows Authentication” (so that all created objects are owned by the dbo user)
Click Connect
Note: If you have a large system, you may want to have your DBA tune the database to take advantage of your server and disk capabilities.
These instructions assume you have created the database and called it unanet as explained in the Create the Database section above
From your Microsoft SQL Server Management Studio, select (click on) your new unanet database.
On the File menu, choose the Open->File option. An Open File dialog box should pop up.
Navigate to the database\sqlserver directory that was created as part of your Unanet installation. (the default location of the scripts is c:\unanet\database\sqlserver) Choose the sqlunanet.sql file and click Open.
A Connect to Database Engine dialog box should pop up along with the contents of the sqlunanet.sql script loading behind it.
Click on the Options button to reveal more options. In the Connect to Database dropdown, make sure that ”Unanet” (or whatever name you used) for the Unanet database) is selected. If you do not see it in the drop down list, select the ”<browse server>” option to refresh the list of databases on that machine. Click Yes to answer the Do you want to continue warning. Under the resulting Browse server for Database dialog that appears, find the User Databases tree. It should have your new Unanet database under it. Select the new Unanet database and click OK. Make sure the unanet database is selected -- This is very important. We don't want to run these scripts in any other database.
Click Connect on the Connect to Database Engine dialog box. The box will disappear and leave the tab with the sqlunanet.sql script open.
Click on the ”! Execute” button in the toolbar above the tab (or right-click anywhere in the tab and choose ”! Execute”, just be sure not to modify the script in any way). The script will begin to execute and the screen will split into to halves – the upper half being the script contents and the lower half divided among two tabs, Results and Messages. The script can take a minute or two depending on your machine specifications. When the script finishes, the Results tab will go away leaving you with the Messages tab.
Make sure that Query Executed Successfully appears at the bottom of the window. If there were any errors, please save the results of the Messages tab by right-clicking anywhere inside the Messages tab and choosing Save As. Choose a location that you will remember and then save the results. Email this to Unanet support (support@unanet.com) and we will assist you.
******* !! IMPORTANT !! *******
Please review the script output file checking for any errors before you continue with the installation.
If you encounter ANY ERRORS, please contact Unanet Support, DO NOT CONTINUE WITH THE INSTALLATION.
Note 2: Whenever the sqlunanet.sql script is run, it first tries to delete any Unanet objects that may already be in the database. For this reason, it is important that you never re-run this script if there is data in the database that you want to keep.
Note 3: If you think you might need to re-run any of the sql scripts, contact the Unanet support staff first and we'll help you decide the best course of action. Remember, always back up your database before performing any maintenance activities!!
Note: If the database was named something other than unanet, you will need to edit the sqlpermissions.sql script, substituting the new database name prior to executing that script. See instructions below.
Next we need to run the permissions script.
From your Microsoft SQL Server Management Studio, select (click on) your new unanet database.
On the File menu, choose the Open->File option. An Open File dialog box should pop up.
Navigate to the database\sqlserver directory that was created as part of your Unanet installation. (the default location of the scripts is c:\unanet\database\sqlserver) Choose the sqlpermissions.sql file and click Open.
A Connect to Database Engine dialog box should pop up along with the contents of the sqlunanet.sql script loading behind it.
Click on the Options button to reveal more options. In the Connect to Database dropdown, make sure that ”Unanet” (or whatever name you used) for the Unanet database) is selected. If you do not see it in the drop down list, select the ”<browse server>” option to refresh the list of databases on that machine. Click Yes to answer the Do you want to continue warning. Under the resulting Browse server for Database dialog that appears, find the User Databases tree. It should have your new Unanet database under it. Select the new Unanet database and click OK. Make sure the unanet database is selected -- This is very important. We don't want to run these scripts in any other database.
Click Connect on the Connect to Database Engine dialog box. The box will disappear and leave the tab with the sqlpermissions.sql script open. Before you run the sqlpermissions.sql script, you may need to change the three variables at the top of the script:
@dbname should be changed to the name of the database you created. The default is 'unanet'.
@dblogin should be changed to your desired database user name. The default value is 'unanet'.
@dbpass should be changed the your desired password for the database user name. The default value is 'unanet'.
**You would be advised to modify the scripts and change the default password to use something other than "unanet", keeping in mind your database password requirements and internal policies.
Click on the ”! Execute” button in the toolbar above the tab (or right-click anywhere in the tab and choose ”! Execute”, just be sure not to modify the script in any way). The script will begin to execute and the screen will split into to halves – the upper half being the script contents and the lower half divided among two tabs, Results and Messages. The usually finishes very quickly. When the script finishes, the Results tab will go away leaving you with the Messages tab.
Make sure that Query Executed Successfully appears at the bottom of the window. If there were any errors, please save the results of the Messages tab by right-clicking anywhere inside the Messages tab and choosing Save As. Choose a location that you will remember and then save the results. Email this to Unanet support (support@unanet.com) and we will assist you.
That's it for running the two SQL Scripts. Close the SQL Server Management Studio.
If you are experiencing the "Database is not currently available" error, you might check out the Common Sql Server Configuration Issues.
If you are still having problems, contact Unanet Customer Support for assistance.
Step 4 -- Install/Configure Java
Once the Database objects are created, you are ready to move on to Step 4 -- Installing and configuring Java.