|
|
|
|
The Create Vendor Invoices from Expense Reports feature is used to create Vendor Invoices from expense reports. The process will create a SUBMITTED vendor invoice document for each selected expense report, having a single Detail entry reflecting the sum of all reimbursable details included in the expense report. Users can review, refine and post the resulting vendor invoice documents via the standard Vendor Invoice functionality. This allows for the expense report owner to be reimbursed for the expenses via the standard Vendor Payment check processing functionality.
If you intend to reimburse your user expenses via payroll, then you would not use this feature, but instead export your expense report details to your payroll system for further processing.
While it is possible to manually enter project expenses via the Vendor Invoice - Details screen, this process of creating the Vendor Invoice from the expense report allows you to take advantage of the data already entered, to include in subsequent payment processing and Financial system reporting. The Expense Report Status report displays details identifying the Vendor Invoices to which a particular expense report is associated.
Expense reports eligible to participate in this process include those in a LOCKED or EXTRACTED status, belonging to a user that has an association with a particular Vendor (via the Person Profile >> Expense >> Vendor field).
On this screen, you will supply both Search Criteria (to identify the Legal Entity, and Expense Reports of interest), as well as supply Transaction Attributes that will be needed during the Vendor Invoice creation process (ie AP Org, AP Account, Fiscal Period, etc.). Once the List has been refined and specific items selected for inclusion, clicking the Create Vendor Invoices button will initiate the process.
This screen is available to users having any of the following roles: Administrator or AP Admin.
This screen is available with the Project Financials family of Unanet licenses.
Topics covered on this help page include:
Search (to refine the list of items to be included and provide creation attributes)
List (to select which items will be included)
Expense Details Click-thru Report (to view expense report details)
Create Vendor Invoices Process (to generate Vendor Invoices)
You may also be interested in:
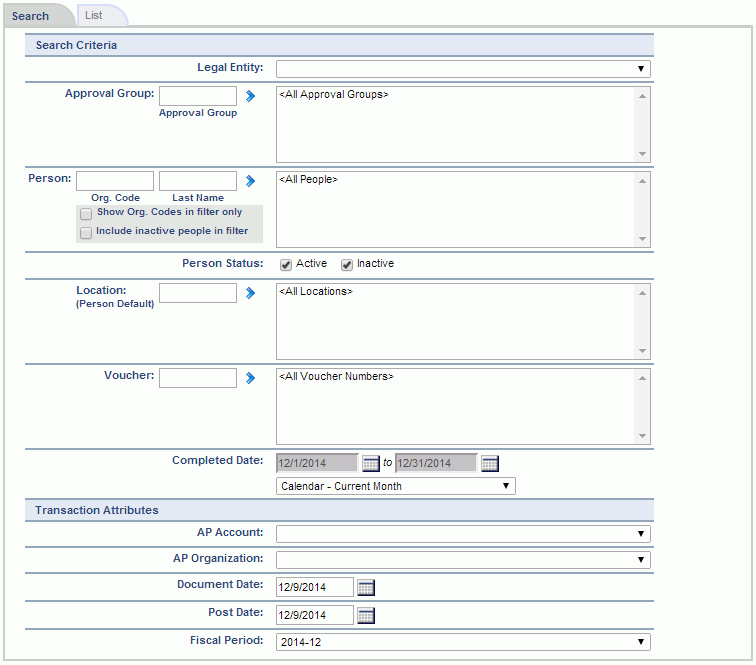
Using the Search screen, you will supply both search criteria and required attributes that will be needed during the Vendor Invoice creation process.
Search Criteria
Legal Entity must be specified, all other Search Criteria is optional.
When changing the Legal Entity:
Vendor Invoice Transaction Attributes
The fields in this section are required (ie AP Account, AP Organization, Document Date, Post Date and Fiscal Period).
|
|
|
From the list of available entries, you can check one or many of the entries to include in the Vendor Invoice creation process. Clicking on the Check All option at the top will toggle the check boxes on each row on and off.
Expense reports eligible to participate in this process include those in a LOCKED or EXTRACTED status, belonging to a user that has an association with a particular Vendor (via the Person Profile >> Expense >> Vendor field).
The entries displayed in the resulting List screen will meet the following criteria:
After selecting the desired entries, you can click on the Create Vendor Invoices button to initiate the Create Vendor Invoice Process.

|
|
|
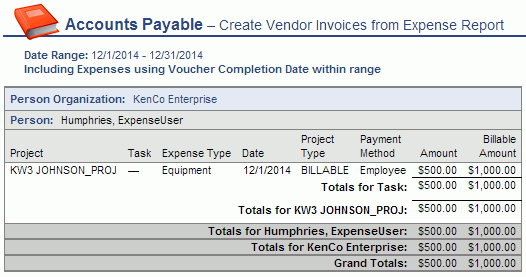
To view expense report details, you can click on the Reimbursable Amount value on the List screen and a popup report in a format similar to the Expense Report Status Report -- Details will be presented. This popup report will display all reimbursable amounts from the particular expense report allocated to projects belonging to the selected Legal Entity.
Once items have been selected on the screen, the process can be initiated by clicking on the Create Vendor Invoices button. The newly generated Vendor Invoices will be left in the SUBMITTED status, available for further editing or posting.
Process Description
Process Feedback
As the Vendor Invoices are created, details of each document created will be displayed along with the start and end date / time stamp for the overall process.
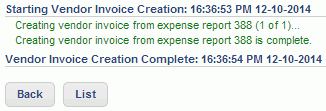
Upon completion of the process, you will have two navigation choices via the available buttons:
![]()