|
|
|
|
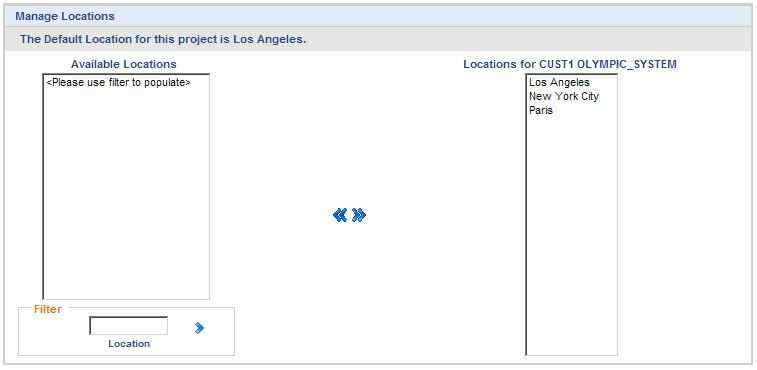
The Location screen is used to manage Locations for a particular project. This feature provides the Project Manager with the ability to limit which Locations will be available for charging on a project by project basis.
This screen is available on the Project Profile which is accessible via the Project >> List option.
Locations can be associated with charged time with or without the column being present on the timesheet. To activate the Location column on the timesheet, the Hide Location on Timesheet Edit (unatime.timesheet.hide.location) property must be set to false.
If no project level Location list is defined, then all active master Locations will be available for charging time, unless a user has a specific project/task assignment that includes a designated Location (in which case, only that Location would be visible in the drop down list for that project/task - for the dates governed by that assignment).
Note that disabling a master Location will not disable any project level Locations, but instead, will prevent the disabled Location from being associated with new or existing projects. In this way, an administrator can define a subset of Locations intended for use on specific projects, but then by disabling it, it will not be generally available for use on other projects.
Note that modifying the Location settings (either the Location on an Assignment, the Project's Default Location, the Project Location list, activating or inactivating master Locations, etc.) may result in the system updating non-extracted / non-locked timesheets via re-rating.
This note does not apply to Historical Time Entries as they do not participate in any re-rating activities.
Topics covered on this help page include:
Import (to import Project Locations for this project)
Export (to export Project Locations for this project)
You may also be interested in:
Location Defaulting Rules (more information about rates, defaulting, hiding labor categories, etc.)
Add Locations
To add new Location entries, select one or many entries from the Available Locations list and click on the right arrow button. You can use the Filter to populate the list of Available Locations.
Remove Locations
Similar to adding Location entries, in order to remove entries, simply select the desired items in the Locations for <Project> window and click on the left arrow button.
Note about Project Default Location: If the current project has a Default Location specified, any project level list of Locations must contain the Default Location value. A project level list of Locations is not required when you have a Default Location specified for a project, however, if you do want to specify a custom project level list of Locations it will need to include the project's Default Location (if one had already been specified).

|
|
The project Location import feature provides the project manager with the ability to load a list of project locations into Unanet. The file must be in the current Project Location Import csv layout. Supply the name of the file to be imported and click on the import button. You can also control the level of informational and warning messages that may be returned to the screen.

Warning and error messages are written to the screen. See the Project Locations Import help page for more information about importing project locations.
The project location export feature provides the project manager with the ability to save a csv formatted file containing information about project locations on the current project. The layout of this output file will match the current Project Locations Import layout.
This feature may be useful if you would like to manipulate the list of project locations via an excel spreadsheet for example, or possibly create a similar list for another project from this project's list of locations. In these scenarios, the project manager could export the list, make any desired changes via a spreadsheet and then import the modified file using the Project Locations Import feature (described above).